With the New Year approaching I just want to wish everyone Worldwide Peace. Create your own colorful chinese name or word with this fun online generator.
I found this idea in Bead Magazine. Create a retro style ornament with beads collected from thrift stores and vintage shops. Most bead stores supply the wire templates. I doubled up on mine for effect. A good pair of pliers and E600 are all you need to finish them off.
Ok Rothko this is not. But giveartpada try and hang your canvas in a virtual gallery. Sometimes you just need to work with color without getting your hands dirty.
The Victoria and Albert Museum online site offers a wonderful variety of interactive art experiences. I found this tile generator along with others that allow people of all ages to play and create. One will find it hard to exhaust the possibilities of making pleasing designs.
Try the Montagerator. You can create with your own images or use some of the options provided on the site. I chose to leave text overlay out this time. The red and white snowflake designs I had previously created using Photoshops tools.
This is a simple way to inspire an abstract and tidy piece of art. Your name is the starting point. See where the process will take you. Spell your name but not in the traditional left to right sequence. Each letter must touch at varying angles but do not overlap the letters. Draw a frame around the cluster of letters and then make various color choices to fill in the shapes created by the name jumble. The beautiful picture above was made by Krystle Seu. She decided to add a curve at the end of each of her letters . It reminds me of latticework or calligraphy or delicate stained glass.
Here is a wall display of folded books. My favorite Charter School was fortunate in receiving a number of new Dell computers for their library. But there was an almost overwhelming amount of waste with the discarded packaging. The Extended Day teachers and I tried to salvage the cardboard for future art projects. The keyboard cardboard boxes proved to work well as looms. And the booklets that came with them were not essential so we collected them and came up with a very pleasing origami project. It really was a good feeling for all to create and recycle.
I think there may be an easier way, but here I can show you a pixelated image that I was able to create on Picture2Life. I then uploaded it to Colorchords to get the color palette and now a needlepoint canvas can be prepared and yarns selected from any uploaded image.
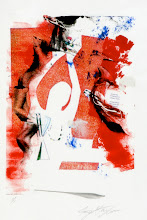
This image I call "Bird in Red" I used Photoshop to create the blended image and watercolor effects. The stamp frame I added as well but the gist of this post is the wonderful color palette that you see to the right of the image. It could be useful to me if I were to translate the image further and make a study of it in acrylic or chalk. Colorchords offers you a very convenient and pleasing way to collect color information from your photo. it does have parameters regarding the size of your photo that you might wish to upload. shrinkpictures.comcan help you with that.
Here is an exercise that is sure to give instant gratification and you can add it to your list of ways to recycle. I used magazine pages here to create an optical illusion . Just cut vertical curved lines into the horizontal page, leaving the top and bottom intact. take another horizontal page and cut curved sections on the horizontal but this time cut through to edges creating strips. Be sure to keep them in sequence while you weave them through. Try this with two of your own photographs. I have seen it done where a night and day shot were taken of the same scene and this cut and weave method was used producing very appealing results.
MoMa has an online interactive site called The Red Studio. It is meant to encourage teens to explore art study. Try the fauxtogram. It is similar to the photogram of darkroom days. And you can also find a nice intro to the work of Man Ray.http://www.moma.org/interactives/redstudio/
I am a big fan of the software design group, ProtoZone. Today I found that one can make a kaleidoscope, a snowflake, a magic carpet, and a 3D moveable sculpture! I originally became aware of these visually exciting interactive tools while visiting The National Gallery of Art's Kid Zone.
Piccyfix is a little less efficient than many of the online editing sites but I think you can still have a little fun there.
The photo that I chose above was taken at Craters of the Moon National Park in Idado. I did use Photoshop to get the Watercolor Effect but ran it through Piccy Fix to see what effects the site had to offer and added a border.
I have a colorful cactus series that I created with the help of Photoshop. Yesterday I found this site called, Pictureful, where I had fun creating a jumbly presentation. Not to be mistaken with Hockney, but I liked it.
This is my collage entitled, "A Diagram of a Hug Me Tight". I created this collage based upon a diagram borrowed from a women's fabric pattern found in " Godey's Lady's Book" 1860.
Just want you to know about a site called Wanokoto. It allows you to upload an image and it will generate for you what appears to be a time long ago. I then uploaded the image to Dumpr.
Make a Mandala online when you need to calm down or relieve stress. Music plays while you make color choices. Of course the healing power of a Mandala is best experienced while drawing by hand, or sifting sand, or fitting tesselations, but nothing wrong with this simple quick fix. Just hit the reset button and your template and color graph will appear. The colors are kind of muted so I saturated mine with adjustments in iPhoto.
The relationship between Math and Art can only be covered by compiling reams of exciting examples. I am offering up a couple, three easy ways to integrate Art with a Math experience.
Create number rubbings with textured cutouts.
While introducing Physics why not play around with a tripod, a pendulum, and a saucer of sand!
Study Buckminster Fuller and create Geodesic Domes with rolled up newspaper. A high school class may be more challenged if they were required to piece together straws to create a full orb.
Recently I had the pleasure of working with some Extended Day teachers at my favorite Charter School in DC. The goal was to try to integrate art projects that would reinforce the Core Value Education offered by the school. A budget for art supplies is always a concern so with that in mind I tried to come up with art experiences that would be inexpensive. I will try to post a few of these ideas for you. The first of which I am calling "We Are Connected Webbing". I repurposed the wooden slats and sticks from a broken shade and found some unused nylon string. I fashioned a simple loom using the lid of a discarded gift box and wove the sticks. The finished piece turned out to be sculptural and fun to photograph.
The exercise was appealing to most and it was my suggestion, if time permitted that the children could work collectively by piecing their individual efforts together to form one long table runner. A perfect place to display such a collaborative piece might be at the Principal's Lunch which is a time when students are recognized for their efforts as good citizens within the school environment.
I used Pages from iWorks to illustrate some of the projects. This is a great program that gives you a 30 day trial program if you are a Mac user. But do visit an online tool called Letterpop to find other templates for publishing.
I created these blended images using Photoshop CS2 layers and filters. The Audubon Society at Moosehill Farm in Sharon, Mass accepted "Atumn " and "Fantasy Bird" into one of their shows and since then I have been offering the collection in greeting cards.
The font that I added to this contact sheet was easy to apply using Picfont. Have fun with it!
A quick and easy site that will help you watermark your images for free is Picmarkr. You have three styles to choose from. And the option to upload your logo if you wish.
This photo is titled "In a Pinch". I spent some time in Tucson a few years ago where I found myself visiting the Tucson Botanical Gardens routinely. As a frequent visitor I was amazed at the discoveries to be had on an almost daily basis!
This is a place for light hearted display of your images. Visit Magic Photo and play around. If you put together something kind of clever you are given the option to apply your masterpiece to product.
I worked with the president and founder of Sport Graphics International years ago to design the company logo. This company offers the best personalized video golf swing analysis available by far. Recently, in order to further enhance the product, we modified the logo a bit and created what we feel is an effective packaging statement. While the company uses the design primarily for DVD labels and jackets, I have been exploring other ways to use the illustration on a few select and functional promotional items. Recently I created these accessories for Sport Graphics International. A ball marker and set of ball mark repair tools are useful and a great gift. I found this great site called Artamatik where there are many products that one can choose from in order to create a custom design.
I am always looking for different editing tools that I can make use of while working with my digital photos, scans, and mixed media collages. This blog is basically a resource for those who like to create and who have a habit of thinking visually. Each post is illustrated with various effects achieved using assist from online editors, mostly available for free! Just click on links, which are keywords highlighted in each post description, and you will be directed to entertaining online photo manipulation sites. I am using my own copyrighted photos and original art to demonstrate the effects suggested in this blog.
I am always contemplating ideas for art educational experiences for elementary level students, young adults and the elderly. So in addition to my personal art focus I would like to, on occasion, share with you some ideas and art projects related to teaching.